
TL;DR Shopify color swatches need two things to work: a color metafield configured in your admin, and a theme that can display it. Most problems come from skipping the product category step, a mismatch between your variant name and color entry, or using a theme that doesn't support swatches natively. This post walks through the correct setup, fixes every common issue, and covers what to do when your gallery still doesn't update after switching variants.
"Swatches not showing. Still text only. Nothing changed."
If you've tried setting up Shopify color swatches and hit a wall, you're not alone. These are the exact comments that show up on every tutorial. And the frustrating part is that most guides only explain half the picture.
Here's why it gets confusing: swatches in Shopify are a two-part system. One part lives in your admin. The other lives in your theme. Both have to work together, or nothing shows up. Most problems happen because one part is set up correctly and the other isn't.
This post covers both. You'll get the full setup, the most common fixes, and an honest answer to the one problem even a perfect swatch setup can't solve on its own. Research shows that clear visuals are the most important factor for 67% of online shoppers — so getting this right genuinely moves the needle.
Watch the full walkthrough here, or keep reading for the step-by-step breakdown.
How Shopify Color Swatches Actually Work
Shopify color swatches have two layers. The first is your admin, where you store color data (hex codes or images) inside a product metafield. The second is your theme, which reads that data and displays it as clickable swatches on your product page. Both layers must be set up for swatches to appear. Most problems trace back to one layer being incomplete.
Think of it like a power outlet. The wiring behind the wall (your admin config) has to connect to the socket (your theme display). If either is missing, nothing works.
The color data lives in something called a category metafield. Metafields are just extra storage fields in Shopify. When you assign a product category, Shopify unlocks a set of related fields including one specifically for color. That's where your hex codes and swatch images get stored.
Your theme then reads those fields and renders the swatches visually. Shopify's own developer blog explains that native swatches became possible through Products 2.0, which gave theme developers a reliable way to access and display color data in variant pickers. Before that, themes used unreliable workarounds.
So when someone says "why do we need a category?" That's why. No category, no metafield. No metafield, no swatches.
Step 1: Set Up the Color Metafield in Your Admin
Go to your product in Shopify admin. Assign it a product category (for example, Apparel & Accessories > Clothing). This unlocks the color metafield. Then add your color entries with hex codes or images and connect the color option to that metafield. Save. That's it for the admin side.
Here's exactly how to do it, step by step.
Open the product you want to configure. At the top of the product page, find the Category field and select the most accurate category from Shopify's Standard Product Taxonomy. For clothing, something like Apparel & Accessories > Clothing works. According to Shopify's official documentation, assigning a category unlocks related metafields including the color field.
Once the category is saved, scroll down. You'll now see a Color metafield section. This is where your actual color data lives.
You might see some colors pre-populated. If your specific color (say, Indigo Wash or Medium Gray Wash) isn't there, click Add new entry. A few important things here:
Name the entry exactly as it appears in your variant options. Shopify matches them by name, so a typo breaks the link.
Add a hex code. If you're not sure what hex code to use, install a Chrome color picker extension. You can pick the exact color directly from your product photo.
Select a base color. This is just the parent color (black, blue, red, etc.) for organizational purposes.
If you're selling patterns or multicolor products, upload an image instead. The image overrides the solid hex color in the swatch display.
Once your entries are set up, scroll back up to the Variants section. Click your color option and connect it to the color metafield. Save the product.
This is also where the "my colors aren't linking" problem usually comes from. If your variant says "Navy Blue" but your color entry says "Navy," Shopify won't match them. They have to be identical.
Step 2: Enable Swatches in Your Theme Editor
Go to Online Store, then Themes, and click Customize. Navigate to your product template. Find the Variant Picker block under the Product Information section. Inside its settings, enable the color swatch display. Choose your shape (circle or square). Save. If you don't see this option, check your theme's documentation, it may be in a different location or not supported.
This is the step most tutorials skip past, and it's where a lot of "nothing changed" moments happen. The admin side is done, but the visual side isn't switched on yet.
In your theme editor, make sure you're viewing the correct template. If your product uses the default template, select that one. Then find the Variant Picker block under Product Information. Click it and look for swatch settings, usually labeled Color Swatch or Display Style.
From there, pick your shape (circle and square are the most common options) and save.
If you don't see a Variant Picker block or swatch option, click on your theme name at the top of the editor and check the documentation. Most themes have the setting, but some put it in a different spot.
Why Your Swatches Are Still Not Working
The four most common reasons swatches fail:
the variant name doesn't exactly match the color entry name
the product category wasn't assigned so the metafield was never unlocked
the theme doesn't support native swatches and the Variant Picker block doesn't have swatch options, or
the browser is showing a cached version of the page. Fix the first three in order, then clear your cache and check again.
Here's a quick breakdown of specific symptoms and what causes them.
Swatches showing as blank or white. The color entry exists but has no hex code or image assigned. Go back to the metafield and make sure each entry has a value.
Wrong color showing for a variant. The color entry name and the variant option value don't match exactly. Check for extra spaces, different capitalizations, or slight spelling differences.
Still showing as a dropdown, not swatches. The theme editor step hasn't been completed. The admin side being done doesn't automatically change the display. You still need to enable it in the Variant Picker block settings.
Auto-matching didn't work. Shopify can pre-fill common colors automatically, but only for standard color names. Custom names like "Indigo Wash" or "Dusty Sand" need to be added manually.
What About 100+ Products?
This is one of the most common questions: "I have 200 products. Do I repeat this for all of them?"
The honest answer is yes, if you're doing it manually. Shopify doesn't have a native bulk upload tool for color metafields.
The practical solution is a tool like Matrixify, which lets you import and manage metafield data via CSV. You can set up your color entries in a spreadsheet and push them to all your products at once. It takes a bit of setup upfront, but it's far better than clicking through 200 product pages one by one.
One thing that helps: if you use the same color names consistently across all products (which you should), Shopify can auto-match them once the entries exist in your metafield library. That cuts down the manual work significantly on future products.
The One Problem Even Perfect Swatches Can't Fix
Here's something that doesn't get talked about enough.
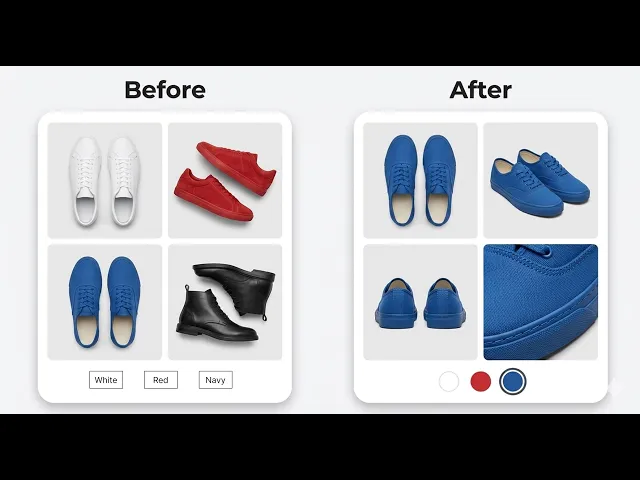
You follow every step. Swatches look great. Colors are correct. Your store looks polished. Then a customer clicks "Sage Green" and the gallery is still showing photos from the Navy colorway.
This isn't a setup error. It's a Shopify platform limitation. Shopify's own documentation confirms that each variant supports only one assigned image. When a customer selects a variant, Shopify scrolls to that one image, but the rest of the gallery stays visible, showing photos from every other color.
So if you have a t-shirt in six colors with five photos each, a customer selecting "Red" still sees all 30 images mixed together. They have to scroll past Navy, Sage, Black, and White photos to find the red ones. One study found that 22% of online returns happen because the item "looked different in person" and showing the wrong variant's photos is a direct cause of that.
This is the "why does only one image change?" question. Now you know why. And it's not something you can fix with metafields or theme settings alone.
For a deeper look at this limitation and how merchants handle it, this guide on multiple images per variant covers all the options. If you want customers to only see images for the variant they selected, showing only selected variant images walks through exactly how that works.
How to Fix the Variant Gallery in 2 Minutes
After setting up swatches on a store selling jeans in multiple washes, I ran into exactly this problem. Swatches were perfect. Colors matched. But when a customer switched from Indigo Wash to Medium Gray Wash, the gallery didn't follow. It was still showing the wrong photos.
Shopify doesn't solve this natively unless you're on a Plus plan with the Combined Listings app. For everyone else, the fix is straightforward.
Install Nova Multiple Variant Images from the Shopify App Store
Open a product inside the app and assign multiple images to each variant
Add the Nova app block to your theme
That's it. Now when a customer clicks a color swatch, they see the full gallery for that variant; front, back, detail shots, lifestyle photos, all specific to the color they selected. No page reload. No scrolling through irrelevant images. The experience works the way customers expect it to.
It's also worth pairing this with hiding variant images until selected so your product page stays clean and focused regardless of how many variants you have.
If you want to go deeper on the app itself, the Nova Multiple Variant Images page covers everything it does and how it works with your theme.
FAQ
Why do I need to assign a product category to set up color swatches in Shopify?
The product category unlocks a set of related metafields, including the color field. Without a category, the color metafield doesn't appear, so you have no place to store hex codes or swatch images. Shopify's documentation confirms this is a required first step. Think of the category as the key that opens the door to the color data your theme needs.
Why are my swatches showing as blank or white?
A blank or white swatch means the color entry exists in your metafield but has no value assigned to it — no hex code and no image. Go back to your product in Shopify admin, find the color metafield, click the entry that's showing blank, and add a hex code or upload a swatch image. Save and refresh in an incognito window to confirm the fix.
Does the Dawn theme support Shopify color swatches?
Yes, but only from Dawn version 13 onwards, and only when using the product category metafield method. Earlier versions of Dawn don't support native swatches. If you're on an older version, you'd need to either update the theme or use a third-party swatch app. Check your theme version in Online Store > Themes before troubleshooting.
How do I set up color swatches for a large product catalog?
Shopify doesn't have a native bulk upload tool for color metafields. The best option for large catalogs is Matrixify, which lets you manage metafield data via CSV import. Set up your color entries in a spreadsheet and push them to all products at once. Using consistent color names across products also helps because Shopify can auto-match existing entries to new products.
Why does only one image change when I click a color swatch?
This is a Shopify platform limitation. Shopify only supports one assigned image per variant natively. When a customer selects a variant, Shopify scrolls to that one image but leaves the full gallery visible. To show a complete set of images for each variant and hide the rest, you need an app like Nova Multiple Variant Images, which lets you assign multiple images per variant so the gallery fully updates on every color switch.